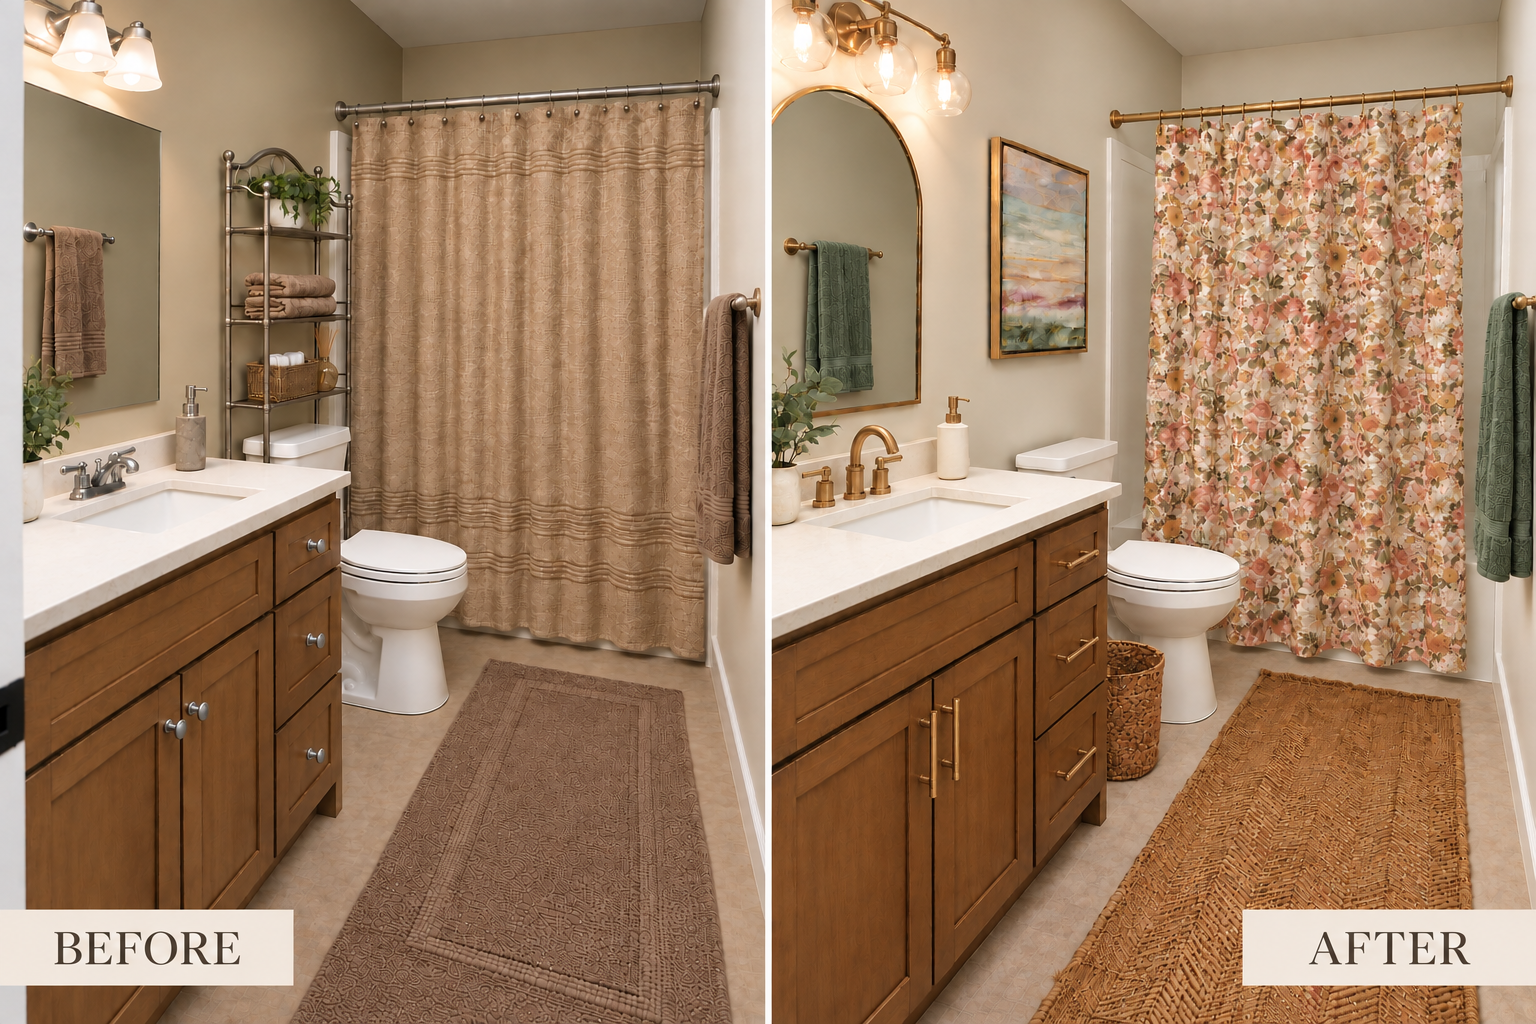
A small bathroom refresh can make a dated space feel completely different without replacing everything in it. The vanity may still be in good condition, the tub and toilet may work perfectly well, and even the flooring may have plenty of life left. Sometimes, it’s everything around those pieces that makes the room feel ready for an update.
So instead of planning a full bathroom remodel, I gave myself a different challenge: How much could I change for less than $1,000 if I kept the expensive parts of the room?
Quite a lot, as it turns out.
A quick note: The room images in this post are digitally created design concepts intended to show how these updates could look in a real home. Product colors, finishes, and appearance may vary.
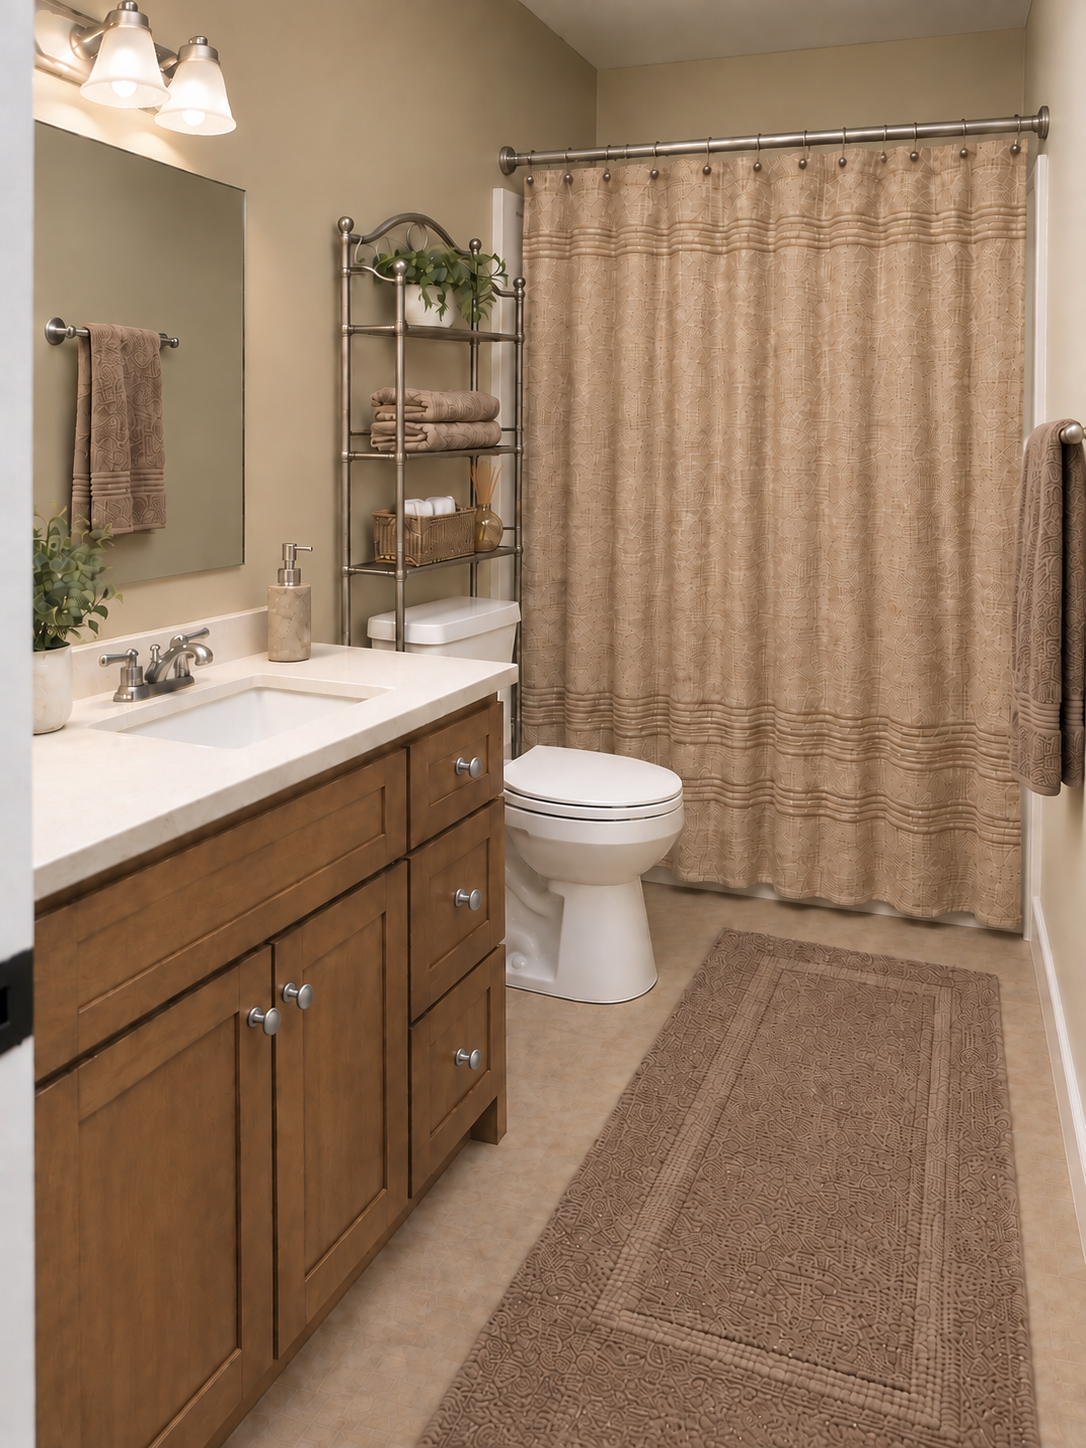
The Before: A Dated Builder-Grade Bathroom
The original bathroom had many of the finishes commonly found in builder-grade bathrooms from the early 2000s: warm beige walls, basic silver fixtures, a large frameless mirror, neutral textiles, and an over-the-toilet metal storage rack. The wood vanity was still in good condition, but the combination of finishes made the room feel dated and a little uninspired.
Nothing was particularly wrong with it. It just needed some personality.
That’s actually an ideal starting point for a budget bathroom refresh. When the layout works and the permanent fixtures are still in good condition, you can concentrate your budget on the details that make the biggest visual difference.
What’s Staying
One of the easiest ways to keep a bathroom refresh on budget is to identify what doesn’t actually need replacing. In this bathroom, the vanity, countertop and sink, toilet, tub and shower surround, flooring, and existing plumbing locations are all staying.
Those are also some of the most expensive parts of a bathroom to change. Instead, the budget will go toward the details that can make the biggest visual difference: paint, lighting, hardware, fixtures, textiles, and accessories.
Keeping those major elements also means this refresh can focus on cosmetic changes that are easier to tackle over a weekend and don’t require changing the layout of the bathroom. It’s a simpler approach that can still make the room feel completely different.
The Plan: A Warm Transitional Bathroom Without Remodeling
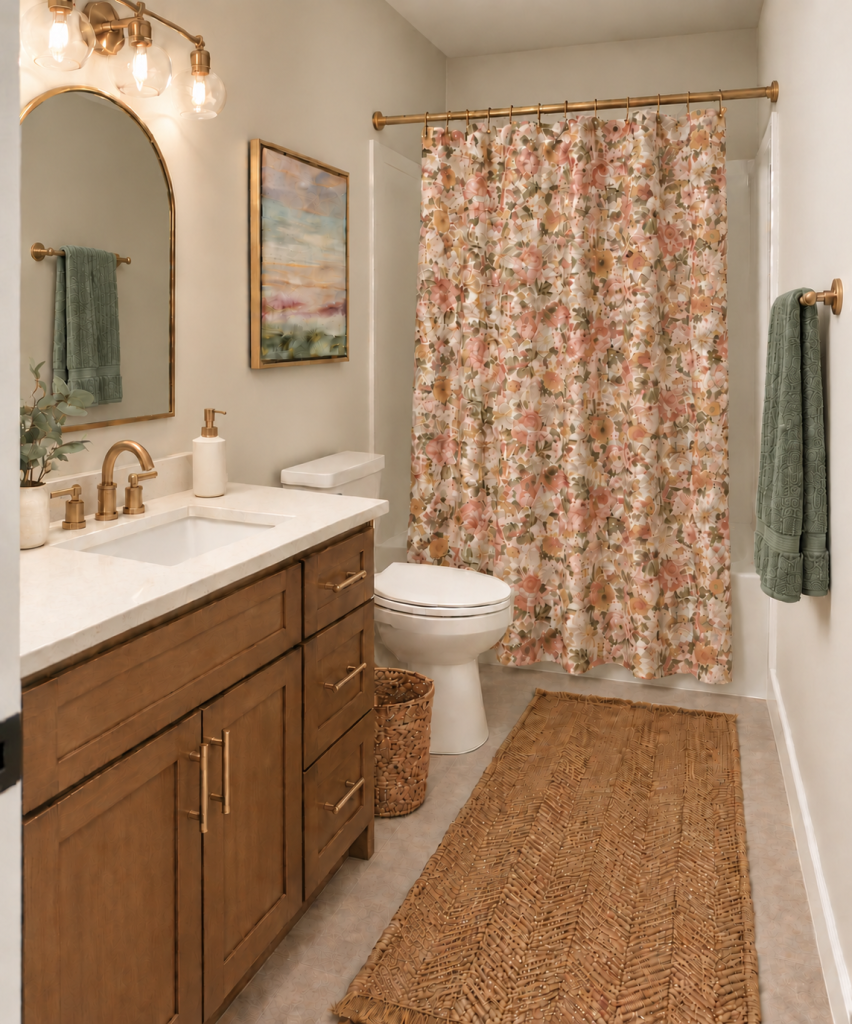
For the new look, I went in a warm transitional direction—updated and polished, but not so trendy that the room will immediately feel dated again.
The palette started with warm white, natural wood, and aged brass. Then I brought in muted green, blush, mustard-gold, and other soft earthy colors through the shower curtain, towels, rug, artwork, and accessories.
1. Warm Up the Walls
One of the least expensive changes is also one of the most effective. The beige walls were replaced with Sherwin-Williams Shoji White SW 7042, a warm off-white with subtle beige and greige undertones.
Shoji White works especially well here because it complements the existing wood vanity and gives the floral shower curtain and brass finishes a quiet backdrop. For the trim and door, Sherwin-Williams Pure White SW 7005 provides a subtle contrast without looking stark.
Simply changing the wall color makes the small bathroom feel lighter, warmer, and much more current.
2. Replace the Builder-Grade Mirror
The large frameless builder mirror was replaced with a slim arched brass mirror. This is one of those relatively simple swaps that makes a surprisingly big difference.
The arch introduces a softer shape into a room filled with straight lines and rectangles, while the narrow brass frame begins to establish the warmer finish used throughout the refreshed bathroom.
3. Update the Vanity Light
Lighting is another relatively simple change that can instantly make a bathroom feel more current. The basic silver fixture was replaced with a three-light brass vanity light with clear glass shades, adding warmth without making the small room feel heavy.
Repeating the brass finish from the mirror helps the vanity area feel intentional and begins to tie the different updates together.
4. Refresh the Vanity Without Replacing It
The wood vanity was still in good condition, so replacing it would have used a large portion of the budget unnecessarily. Instead, I updated it with a warm brass widespread faucet and slim brass cabinet pulls.
These are small changes, but together they give the existing vanity a completely different look. Before assuming older cabinetry needs to go, try changing what’s attached to it first. New hardware and fixtures can make a surprisingly big difference for a fraction of the cost of replacement.
I also replaced the basic silver bathroom hardware with a coordinating brushed-gold hardware set, including the towel bar, towel ring, toilet paper holder, and robe hook. Repeating the same warm metal finish throughout the room helps all of the individual updates feel like part of one cohesive design.
5. Let the Shower Curtain Set the Palette
In a small bathroom, a shower curtain takes up a surprising amount of visual space, making it one of the easiest places to introduce color and personality without making a permanent design decision.
I chose a floral shower curtain with an ivory background and a mix of dusty blush, muted greens, mustard-gold, and soft neutral tones. Instead of matching every color in the pattern, I used it as a jumping-off point and repeated individual colors throughout the room.
A clear PEVA shower curtain liner keeps the curtain colors visible and bright, while a brushed brass shower rod and rings replace the dated silver hardware and coordinate with the other warm metal finishes in the room.
6. Add Color Through the Towels and Rug
Rather than matching the towels to the pink flowers in the shower curtain, I pulled out one of its quieter colors and chose muted green towels. The green connects naturally with the leaves in the floral pattern while adding contrast against the warm wood, brass, and creamy walls.
For the floor, I chose a washable mustard-gold woven runner with subtle herringbone texture and fringe. The mustard picks up another color from the shower curtain and works beautifully with the warm brass finishes without making the room feel overly coordinated.
Because the shower curtain already provides plenty of pattern, keeping the rug relatively simple gives the room some visual breathing room.
7. Finish the Room With a Few Simple Accessories
With the larger elements in place, the room only needed a few finishing touches. I chose a muted abstract landscape in a slim brass frame that repeats the soft blush, green, cream, and blue-gray tones found elsewhere in the bathroom.
On the vanity, a small faux eucalyptus plant in a white ceramic pot adds a little greenery, while an ivory ceramic soap dispenser with a brass pump repeats the warm metal finish without adding clutter.
A woven water-hyacinth wastebasket adds natural texture beside the vanity and works especially well with the warm wood cabinetry.
None of these accessories are particularly dramatic on its own—and that’s the point. Together, they make the bathroom feel finished without filling a small space with unnecessary décor.
The Before & After
The biggest difference becomes clear when you compare the two versions side by side. The vanity, countertop, toilet, tub, flooring, and layout haven’t changed. Nearly everything creating the transformation comes from paint, fixtures, hardware, textiles, and a few carefully chosen accessories.
The Budget
The goal was to keep the entire refresh under $1,000—and because the expensive parts of the bathroom stayed in place, there was plenty of room in the budget to update the pieces that made the biggest visual difference.
Estimated project total: about $835
This total includes the paint and supplies along with the fixtures, hardware, textiles, and accessories used to create the look. Prices can change over time, so think of this as a guide rather than an exact shopping total. Use the product links throughout the post to check current pricing.
Even with those updates, the project stays comfortably below the $1,000 goal—largely because the vanity, countertop, sink, toilet, tub and shower surround, flooring, and plumbing locations were left in place.
Where the Budget Went
Instead of spreading the budget across major renovations, the money went toward the smaller changes that have the biggest impact on how the bathroom looks and feels.
- Paint and painting supplies
- Arched brass mirror
- Brass vanity light
- Widespread brass faucet
- Brass cabinet and bathroom hardware
- Floral shower curtain and clear liner
- Green towels
- Mustard-gold runner
- Framed artwork
- Soap dispenser, wastebasket, and small decorative accessories
The takeaway isn’t that every bathroom needs these exact pieces. It’s that keeping the expensive, functional parts of a room can leave enough room in the budget to update nearly everything that makes it feel dated.
Shop the Look
Want to recreate the look? These are the pieces used to give this small bathroom its warm transitional style. You don’t need to use every item—choose the updates that make the most sense for your bathroom and your budget.
Note: Product availability and prices may change over time. Check the retailer links for current details.
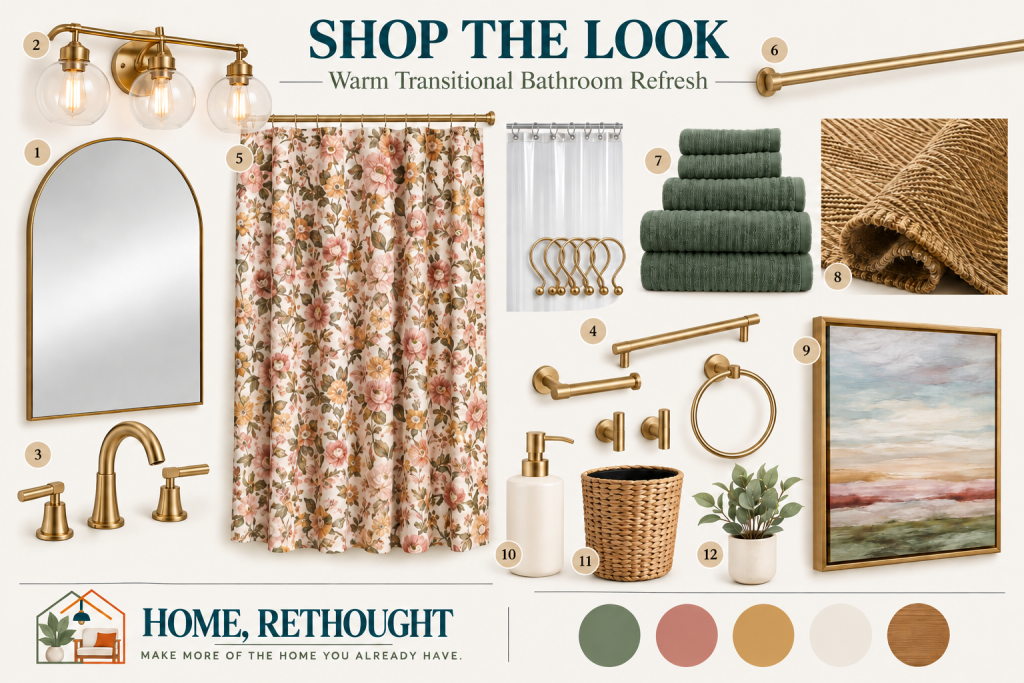
Arched Brass Mirror
Brass Vanity Light
Widespread Brass Faucet
Floral Shower Curtain
Shower Curtain Essentials
Green Bath Towels
Washable Mustard-Gold Runner
Framed Abstract Landscape
Ivory Ceramic Soap Dispenser
Woven Water-Hyacinth Wastebasket
Faux Eucalyptus Plant
Before You Remodel, Look at What You Already Have
It’s easy to look at an outdated bathroom and mentally start tearing everything out. But before planning a full remodel, take another look at what’s already there. What actually needs replacing—and what simply needs rethinking?
In this bathroom, keeping the vanity, countertop, toilet, tub, flooring, and layout left enough room in the budget to change nearly everything that was making the space feel dated.
The result isn’t a brand-new bathroom. It’s the same bathroom—just warmer, fresher, more intentional, and much more reflective of how we’d want it to look today. Sometimes, making more of the home you already have is all a room really needs.